No one questions that Google has long established itself as everyone’s favorite search engine. But that splash screen it’s so big, so white, so drab.
I wish something could be done about it, but it can! In case you didn’t know, you can add a fun and personalized touch to the look of the search engine with just a few clicks. Here we explain step by step how to change the background image in Google with a new theme.
One detail: you will need to run the Google Chrome browser, as this will not work with Microsoft IE, Edge, and Firefox.
Table of Contents
1. Use a theme
In this section, we will install a theme that you can download from the Chrome Web Store. These generally include a custom image that appears in the background of the New Tab and different colors throughout the scan.
a. Step 1: open the appearance settings
First of all, look for the Themes settings in Google Chrome.

Step 1: Click on the three-dot icon for Personalization and Control, located in the upper right corner.
Step 2: Select the Settings option from the drop-down menu.
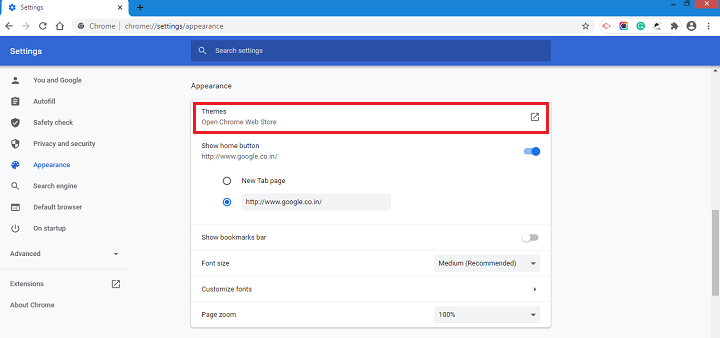
Step 3: The Settings tab will open in the browser. Select Appearance.
Step 4: Click Themes. This action takes you to the Chrome Web Store.
Note: You can also access these settings by typing chrome://settings/appearance in the browser’s address bar.
Open Google Chrome and look for three dots in the upper right corner of your browser window. Click on them to open Chrome’s main drop-down menu. Towards the bottom of the drop-down menu, you’ll see the Settings section. Please select this option.
b. Step 2: Choose the theme

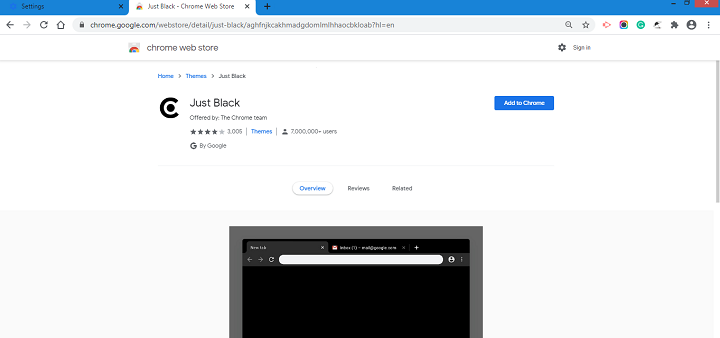
This new Chrome page takes you directly to the Themes section. In this section, there are many to choose from. They are shown divided by content type. The main image you usually see is the one that will appear as the Google background, so you can use it to guide you in your choice.
Each section shows only the best-rated images for that type of content, but you can take a look to see it larger by clicking on it. And if you want to see only those in that section, click the See all icon at the top right of the page.
If you only want to see the themes developed by Google, click the All option, located in Categories on the left, and select from Google in the drop-down menu.
Once you’ve selected a theme, be sure to check out the preview images and reviews. Keep in mind that most pieces spread their colors and patterns across the browser window and tabs, so take a look at the full face to see if you like how it looks.
Selecting the account will show more themes from that particular developer. Remember that most themes spread their colors and patterns across the browser window and tabs, so check the full appearance before installing.
c. Step 3: add it to Chrome

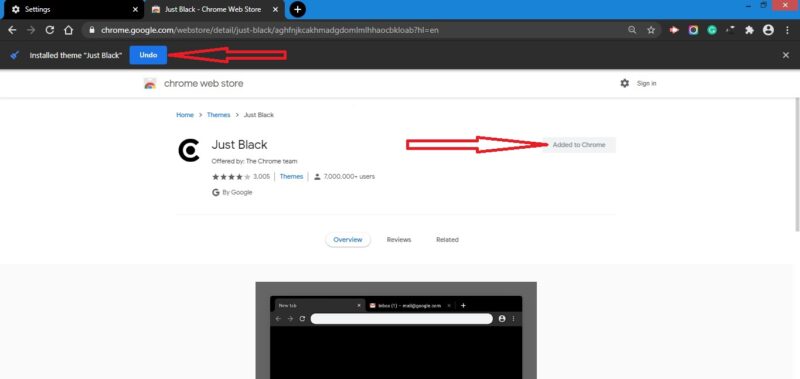
If you find one you like, click the Add to Chrome button in the upper right corner. As Chrome applies the theme, this button turns white and says Added to Chrome. You will also see a blue button if you want to Undo.
Your new theme automatically transforms the appearance of the browser. The tabs may or may not change color, and if you open a new account, you should see the main image of the theme.
Check if you like it; sometimes, you might like the image but not what it does to the lashes or the colors it adds.
If that’s the case, hit the Undo button or go back to Appearances in the Settings menu and return to the default theme. You can choose and disable as many articles as you want while looking for the right one!
2. Customize Your Chrome
You may not be interested in any of the topics or would prefer to use a personal image. In this section, we will guide you so that you can add a custom image and change the colors, without having to install a theme.
a. Part 1: select a custom image
First, we will install a custom image provided by you or Google.

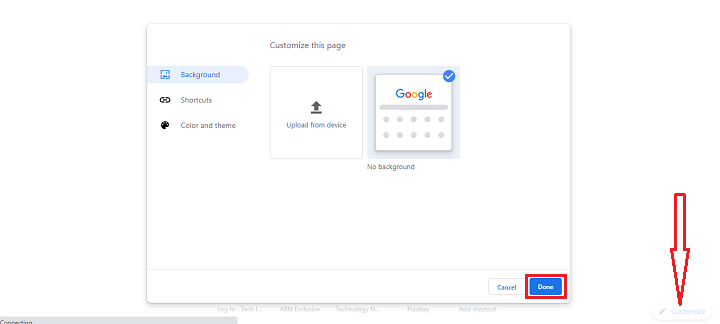
Step 1: Open a new tab and click the Customize button located in the lower right corner.
Step 2: A window appears in the browser with the Background category, which opens by default. Select a background or click Upload from device to use an image stored on your computer. If you select the latter, Chrome will open a pop-up window ( File Explorer / Finder / Files ), so you can locate and select your preferred image.
Step 3: Click the Done button to finish the changes.
When you open a new tab window in Chrome, your image will now appear on the screen. You can remove this setting at any time by clicking the Custom button again (in this case, it’s just a pencil icon) and selecting No Background.
b. Part 2: select a color and theme
If you want to change the overall look of Chrome in addition to adding a custom background image, but you’re not sure how to install a theme, do the following:
Step 1: Open a new tab and click the Customize button located in the lower right corner.
Step 2: A window appears in the browser with the Background category, which will open by default select Color and Theme from the list on the left.
Step 3: choose a two-color swatch.
Step 4: Click the Done button to finalize your change.
Note: Your current theme installed from the Chrome Web Store appears above the color swatches. You can click the arrow button to open the store and install a new piece.
This option does not appear on color swatches when there is no theme installed; you should take the detailed route in the first half of this guide.


